3D View Tab - Controls
The 3D-View Tab provides a 3D canvas where you can view, manage and analyze your reconstruction. The left side contains a view with the main controls for the 3D-View. At first an empty 3D scene is created where you can add more objects.
On top of the view there are 2 buttons: Add and Delete.

Clicking the Add Button will open a new window where the user can decide what objects to add.
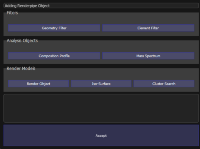
The available objects are divided in 3 categories:
- Filters: these objects filter out data. The filters are either geometry filters (cube, cylinder, sphere) and element filters. More on them later.
- Analysis objects: these analysis tools that can be added.
- Render Model: these objects create 3D structure that are rendered in the scene.
The Delete button allows you to delete an object you have created. All objects except for the Scene can be deleted.
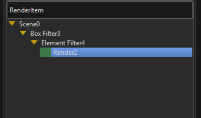
Below the Button there is the Render Tree. It contains a hierarchical structure of all the currently added objects. Data passes from the top level to all its children and from every child to its own children. In this picture the Scene passes the data to the box filter. The box filter out all elements and molecules that are on its outside and then passes the data to the element filter. The element filter removes all elements and molecules of certain types (user decides) and then passes the data to the Render Object which displays every element and molecule in 3D

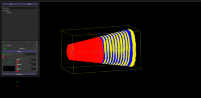
At the bottom the properties of the currently selected object (blue background in the Render Tree) are displayed and allow the users to modify it to their needs. Each object has its own properties and when switching between objects the properties are updated
The rest of the page is the 3D Scene. Here all objects are rendered based on their properties and the hierarchies dictated by the Render Tree.
Controls
The scene object also contains a camera that can be manipulated. In order to do so no all geometry filter objects need to have the selected property red. The following movements are possible with camera.
- Pressing R will reset the camera to its initial position
- Pressing SHIFT + X, Y or Z will orient the camera so that the x-axis, y-axis, z-axis respectively of the coordinate system points towards you.
- Pressing CTRL + X, Y or Z will orient the camera so that the x-axis, y-axis, z-axis respectively of the coordinate system points away from you.
- Scrolling the mouse wheel out will zoom in the scene.
- Scrolling the mouse wheel in will zoom out the scene.
- Holding the left mouse button while moving the mouse will move the camera so that it looks that the objects move in the direction of the mouse
- Holding X, Y or Z pressed while holding the left mouse button pressed and moving the mouse left or right will move the camera in a direction so that it looks that the objects move in the x, y or z axis respectively.
- Holding the right mouse button clicked while moving the mouse will rotate the camera around so that it looks that the objects rotate around an axis perpendicular to the mouse movement and that passes through the center of the Render object.
- Holding SPACE while holding the right mouse button clicked while moving the mouse will rotate the camera around so that it looks that the objects rotate around an axis perpendicular to the screen plane and that passes through the center of the Render object.
- Holding X, Y or Z pressed while holding the right mouse button clicked while moving the mouse will rotate the camera around so that it looks that the objects rotate around an axis parallel to the x, y or z axis of the coordinate system that passes through the center of the Render object. This is the same rotation as before but it eliminates small movements of the mouse in an undesired direction.
- Pressing P will open a window where the current 3D scene can be saved as a picture.
HIDDEN CONTROLS
In Scito there are also hidden controls that were not mentioned in this manual.
CHARTS
To activate the hidden controls on a chart, it first needs to have focus (by clicking it once). Every chart can be manipulated using these controls:
LEFT and RIGHT buttons will move the right border of the chart.
Holding SHIFT while pressing LEFT and RIGHT buttons will move the left border of the chart.
UP and DOWN buttons will move the upper border of the chart.
Holding SHIFT while pressing UP and DOWN buttons will move the lower border of the chart.
Double-Clicking on a chart will open a dialog that can create a text file with all the coordinates of every series in that chart.